
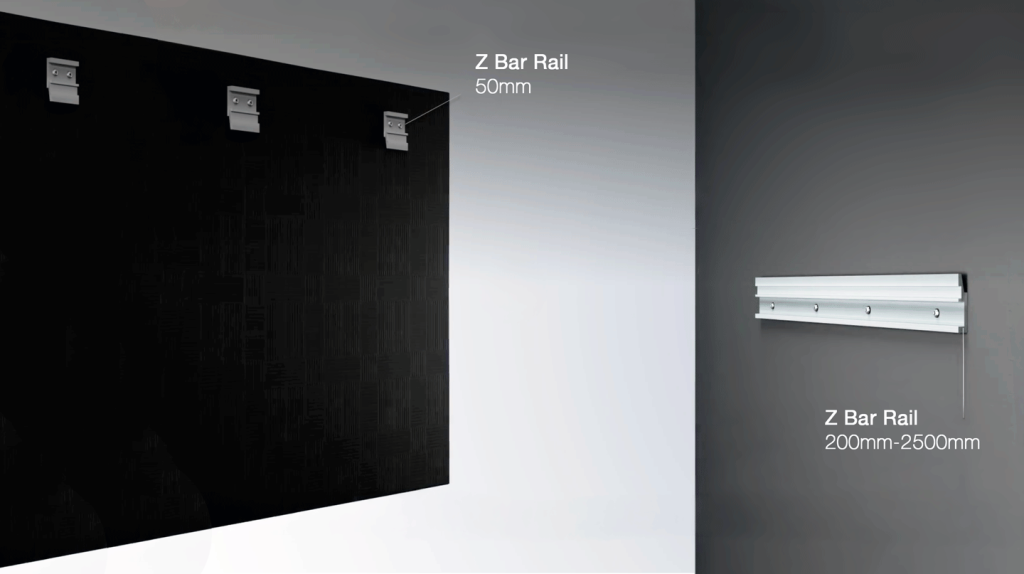
When hanging heavy artwork, oversized mirrors, headboards, acoustic panels, or commercial cabinetry, standard picture hooks and drywall anchors won’t cut it. To ensure absolute safety, structural security, and a seamless flush fit, trade professionals and interior installers turn to Z Bar heavy-duty systems.
Often called aluminium French cleats, Z Bar systems provide unmatched weight capacity and foolproof installation. In this ultimate buyer’s and installation guide, we break down how Z Bar systems work, why Metalciti heavy-duty hanging systems stand out as the industry standard, and how to choose the right setup for your project.
What is a Z Bar Heavy Duty Hanging System?
A Z Bar system is a two-part interlocking wall-mounting bracket setup. Extruded from high-grade aluminium alloy, the profile forms a distinctive “Z” shape that hooks tightly into an identical mating rail.
- The Wall Rail: Secured horizontally into wall studs or masonry anchor points.
- The Object Rail: Mounted inversely onto the back of the item you wish to hang.
When lower body weight lowers the top cleat into the wall cleat, the two Z-profiles interlock firmly. This transfers downward shear force directly into the wall studs, letting you hang items weighing from 30 kg (66 lbs) to over 360 kg (800 lbs) with zero risk of slippage.
Why Choose Metalciti Z Bar Systems over Standard Hardware?
While generic French cleats exist, Metalciti Z Bar hanging systems are manufactured specifically for high-demand residential, commercial, and gallery environments. Here is why architects, trade installers, and picture framers prefer Metalciti:
1. Architectural-Grade Extruded Aluminium
Metalciti rails utilise high-tensile 6063 T5 aluminium alloy. This offers an exceptional strength-to-weight ratio, ensuring the rail won’t bend, bow, or warp under continuous heavy loads.
2. Ultra-Flush Mounting Profile
Unlike bulky mounting boxes or thick timber cleats that leave unsightly gaps, MetalCiti Z Bars keep your items close to the wall, typically leaving minimal clearance of under 1/4 inch (6mm) for a sleek, floating aesthetic.
3. Modular & Customisable Lengths
You can buy Metalciti heavy-duty Z Bars in pre-cut lengths (such as 150mm, 300mm, 900mm, and 1000mm) or custom-cut with a standard hacksaw or mitre saw. Need to span multiple studs for an oversized 80kg mirror? Run a continuous Metalciti rail along the entire length.
4. Precision Pre-Drilled Holes
Spacing studs on centres can vary. MetalCiti rails come with precision pre-drilled fixing holes spaced strategically along the bar, giving you infinite flexibility to secure fastenings directly into solid timber studs or wall plugs.
Key Applications for Heavy-Duty Z Bar Cleats
MetalCiti Z Bar systems solve the challenge of mounting high-value, high-weight objects across various industries:
- Heavy Mirrors & Glass Panels: Eliminates wire strain and distributes glass weight evenly across the frame.
- Commercial Signage & Wall Cladding: Ideal for retail spaces, hotel lobbies, and corporate offices requiring flush, tamper-proof displays.
- Cabinets & Floating Furniture: Safely supports wooden cabinetry, floating vanities, and cornices.
- Large Framed Artwork & Canvas: Used by galleries and museums to prevent artwork from shifting or hanging askew.
- Headboards & Acoustic Panels: Secures heavy textile headboards and soundproofing panels tight against interior walls.
How to Install a Metalciti Heavy Duty Z Bar System (Step-by-Step)
Installing a heavy-duty Z Bar is quick, straightforward, and virtually guarantees a perfectly level finish every time.
Tools Required:
- Metalciti Z Bar Set (Wall rail + Object rail)
- Digital or Bubble Spirit Level
- Stud Finder
- Drill & Suitable Wall Anchors/Screws
- Measuring Tape
Step 1: Locate Your Wall Studs
Using a stud finder, locate and mark the centre of the wall studs where you plan to hang your object. (Note: For brick or concrete walls, heavy-duty masonry plugs will be required.
Step 2: Mount the Wall Rail
Place the first MetalCiti Z Bar against the wall with the cleat lip facing UP and outward. Place your spirit level on top of the bar. Drive your first screw into a central stud, adjust until perfectly level, and then secure the remaining fixing holes into additional studs or wall anchors.
Step 3: Attach the Object Rail
Attach the matching MetalCiti rail to the upper backside of your mirror, frame, or cabinet. Ensure the cleat lip faces DOWN and inward (inversely to the wall rail). Measure carefully from the top edge of your object so the bar sits completely square.
Step 4: Interlock & Secure
Carefully lift your item, position it slightly above the wall rail, and slide it downward until the two Metalciti Z Bars interlock seamlessly. Slide left or right along the bar to fine-tune horizontal centring.
Z Bar vs Traditional Wire & Screw Hanging
|
Feature
|
Traditional Wire & Hooks
|
MetalCiti Heavy-Duty Z Bar
|
|
Max Load Capacity
|
Low to Medium (Up to 15-20kg) |
Heavy-Duty (Up to 100kg+)
|
|
Weight Distribution
|
Concentrated at 1 or 2 points |
Evenly spread along the entire bar
|
|
Stability
|
Easily knocked crooked |
Locks rigid; remains 100% level
|
|
Wall Clearance
|
Tilts forward from the top |
Sits flush against the wall
|
Upgrade Your Hanging Hardware with Metalciti Z Bar Systems
When safety, precision, and heavy-duty load capacity matter, don’t rely on basic hardware. Metalciti heavy-duty Z Bar hanging systems give peace of mind to residential DIYers and commercial installers alike.
Explore our full range of Metalciti Z Bar French cleats, individual rails, and complete mounting kits today to elevate your next installation project.